Using Xcode and Swift Package Manager Together
07 Mar 2016If you’re developing in Swift and using the Swift Package Manager to manage your dependencies, you may have noticed that you can’t easily use Xcode to write your project. You aren’t able to import any of your dependencies into your package, and so tons of errors appear.
This is how I created a new project and integrated it with my dependencies build with spm.
This post was written with Xcode Version 7.3 beta (7D162j) and the Swift DEVELOPMENT Snapshot 2016-03-01 (a). There is already work in progress to integrate spm and Xcode. So this post will quickly be out of date 😉👍
The Problem
Since the 2016-02-25 Swift development snapshot, swift build will no longer output static libraries. Because of this, there is nothing to import into Xcode.
What we need to do is force spm to output dynamic libraries that we can import into Xcode. After importing them, it will be able to find their symbols and we can develop normally.
There’s a few steps that we can take to fix this:
- Make an
./XcodeProjectdirectory with the Xcode Project inside - Force dependencies to output dynamic libraries
- Add dynamic libraries to the Xcode project
- Add a build script
Adding an XcodeProject Directory
I don’t think this is absolutely necessary, but I thought it was a nice setup. In the project I created, my directory setup looked like this:
├── App
│   ├── main.swift
│   └── *Other Sources*
├── Package.swift
├── Packages
│   └── *Package Directories*
├── Tests
│   └── *Test Files*
└── XcodeProject
    └── Project.xcodeproj
The XcodeProject directory just stores the project and nothing else. It’s basically just temporary until Xcode-spm integration is complete.
Force Dependencies to Output Dynamic Libraries
OK, I have to admit – this step kind of feels messy, but when dealing with alpha-state software, sometimes you’ve gotta get our hands dirty.
After running swift build once to fetch your dependencies, your Packages directory will have all the directories inside.
What you’ve gotta do is edit the Package.swift of all those packages to force it to output a dynamic library. All it takes is adding these two lines to each of the Package.swift files (but change the names and stuff of course!)
// Added for https://github.com/kylef/Curassow
let libCurassow = Product(name: "Curassow", type: .Library(.Dynamic), modules: "Curassow")
products.append(libCurassow)
Then run swift build again, and then within our .build/debug directory, you should now have some .dylib files for each of the dependencies.
Add Dynamic Libraries to the Xcode Project
Open up our Project.xcodeproj in Xcode, and drag the newly-created .dylib files into your project. I recommend just referencing them, and not bringing a copy into your project.
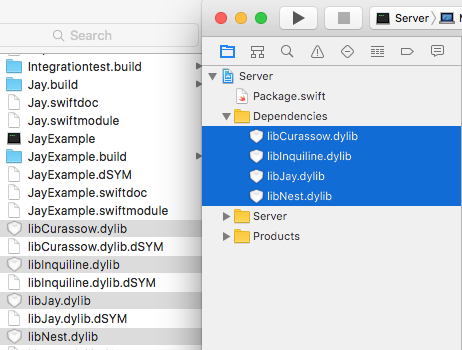
Inside the build settings, you will have to tell Xcode where to find them.
Assuming you have the same directory setup as above, you will have to add $(SRCROOT)/../.build/debug to the Library Search Paths and Import Paths in the build settings.

You might add in $(inherited) as well, if you have other settings that were already imported that you need to preserve.
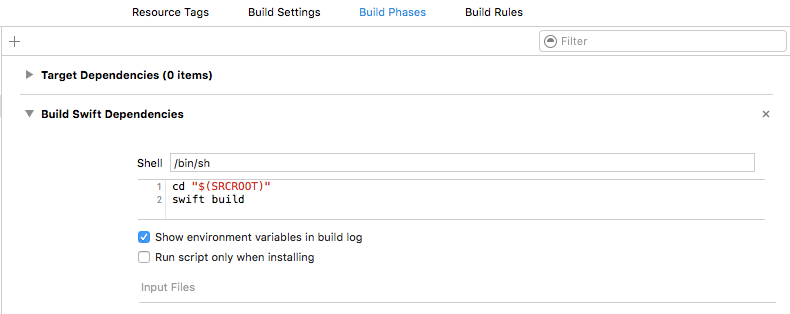
Add a Build Script
Now you’ll want to add a Run Script build phase. What this will do is make sure you run swift build instead of relying just on Xcode’s build system.
The script I use is just:
cd "$(SRCROOT)"
swift build
which seems to be enough. Xcode still ends up building my project, but it’s small enough that it doesn’t bother me.
My set up ends up looking like this:
Develop and Build!
That’s really all I did to get Xcode to recognize the dependencies I imported with the Swift Package Manager. By doing this, I was able to do all my normal development in Xcode, which was great because all auto-complete and click-to-definition worked!
However, there is already a pull request open to integrate Xcode Project Generation, so it’s possible that this post is out of date before you even read it!